
 First, I dim the reference picture behind by 30% so that my pen tool doesn't get covered up by this cute little baby girl. And yes, you can see, I'm chatting while I do my work. I multi-task. :)
 Then, I slowly trace the picture with pen tool. Tsk, Randy Tan and his spammage on my yahoo messenger down there at the bar.
 And I'm 1/4 done with the face. I know, she doesn't look that cute and baby-looking anymore, don't need to remind me...
 And then I dim 30% on Mamima tall, the giraffe and repeat the same process, by tracing it over.
 Ta-dah! I finished tracing Mamima tall and baby girl's face! I freelanced the girl's body, though. I added in some colours to make sure they match, and not go out, or unbalanced. That's a base colour.
 I did her legs and adjusted the position of girl and Mamima giraffe.
 Oh uh, here comes the messy and hard-to-explain part. I added in some shadow section into girl and Mamima to create shades for them to look like there is sun. I intersected the shadow section into the base lines to make the shadow section more prominent. Also pen tool-ed.
 By now, I would expect everyone to know how to colour bases already. :) I coloured the base, and then used gradient on the shadow sections, after that I went to transparency -> select multiply to make the shadow section colours blend in really prominently into the base, to make it stand out but not too attention attracting either.
P/S : Suddenly my illustrator cs turned into illustrator cs3! SUPER!
 And so, I did some hoo-ha pretty effects on her hair acessory. First, I created a small darker blue circle with ellipse tool, then I blend it with the light blue outside by going to object -> blend -> make. Then, I used the ellipse tool again to create a gradient of black to white into the rubber band, and set transparency -> screen to make the rubber band balls to look very shiny. To do this, you MUST MAKE SURE that your black in the gradient is (that is, if you're using CMYK mode, I used it) C, M, Y and K=100, or it won't blend!
 And the main starrings are born!
 And so I did some tiny bit of background. I don't want to do much, or I don't know what I can do for assignment 3. Added the ground with ellipse tool, and set Effect -> distort and transform -> Zig zag for the distorted ground effect and effect -> stylize -> outer glow for the black glow. And I used the brush tool for some fancy strokes called thick pencil for the cracked ground. I also used a thick, brush tool called fude for the tree branch/vein. As for the leaves, I used my old trick that I used for my symbol for it - object -> blend -> blend option -> set to specified steps and insert random numbers -> ok -> make. :)
 BURN, MAMIMO GIRAFFE, BURN!!!!! Well, as usual, I use gradient on the fire layers 1 by 1, and set some effects like Effect -> Stylize -> Inner glow, and outer glow. Then I copy pasted, ctrl c then ctrl v and scaled the fire and added them randomly around.
 And then, I scaled and set the position of my symbol drawn for assignment 1. AND IT'S DONE!
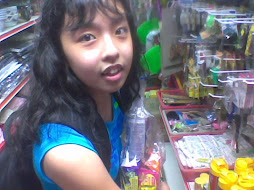

No comments:
Post a Comment